
January 8, 2021
February 11, 2026
11 Steps to Plant a Tree

1. Choose the Right Tree for the Right Place.
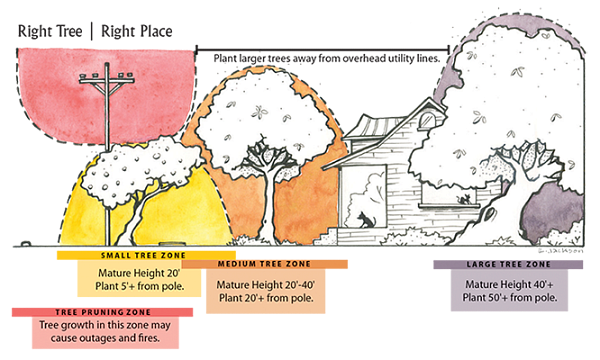
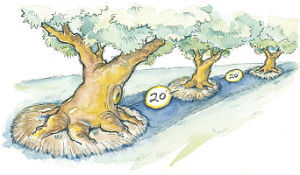
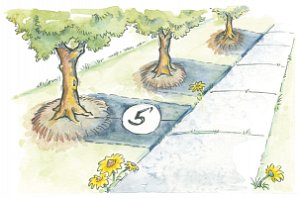
Plant a tree where it has room to grow to maturity. Consider how far it will be from other trees, buildings, and sidewalks. Always consider the tree's mature size, and follow the guidelines below when there are above- or below-ground utility lines.
Austin soil tends to be very alkaline, so many species cannot grow well here. Most maples, pines, and dogwoods are poor choices. Search for tree species recommended for Central Texas.
2. Plant at the right time in Austin
In Central Texas, the best time to plant trees is during the fall. We often call October through March Austin's tree-planting season. Our winters are mild enough that freezing won’t be an issue as the tree begins sending roots out into its new home. By the time it gets hot and dry again, the tree is better prepared for the harsh conditions.
3. Buy a high-quality tree.
Visit a local nursery with trees well adapted to our climate. Examine the roots, branching structure, and trunk:
- Pull the tree from the container to examine the roots. It is normal to find a mat of fine roots circling the edge of the ball. A tree that has been in the container too long will become root-bound, with large circling roots around the ball. Choose a tree that has visible healthy roots that are no larger than ¼" in diameter.
- Look for trees with branches spaced vertically along the stem and around the tree. Branches that are attached at wide angles are stronger than branches that have tight, narrow forks.
- Look for wounds on the trunk. Injuries can lead to disease.
Free Trees! You can get a free tree from Austin's Neighborwoods Program, administered through local nonprofit TreeFolks with funding from the City of Austin.
4. Time to Dig In!
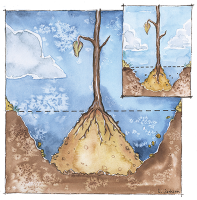
The hole should only be dug as deep as the root ball. This might be shallower than it appears in the container. To find the proper depth, locate the root flare (the area where the trunk tapers out to meet the lateral roots). You may need to brush off excess soil from the top of the root ball to find the root flare. Don't forget to call 8-1-1 before you dig!
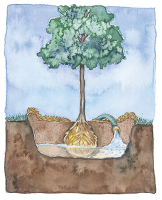
If you dig the hole too deep, replace some soil and compact it at the bottom to reduce settling of the tree later. When in doubt, plant a little higher than the soil surface rather than deeper. Make the hole three times as wide as the container if you have enough space. Use the tip of the shovel to break up any compaction around the sides of the hole.
5. Prepare the root ball.
Remove the tree from the pot. You might need someone to help hold the container while you pull the tree out. Once it is out of the pot, you need to correct any circling roots at the outside of the ball. If you have one tree and lots of time, you can untangle the roots to spread them throughout the planting hole. Otherwise, use a clean hand saw to remove the outer edge of the root ball all the way round. This will prepare the roots to grow straight into the native soil.
Avoid moving the tree by the stem as much as possible. Hold it by the root ball or the very base of the stem.
6. Place the tree.
Once you tease out the roots, create a small mound in the hole for the trunk to sit on, and spread the roots outward along the mound. If you shaved off the root ball, center it in the hole.
Step back and look from all sides to make sure it is straight. If your tree was dug in a field, the nursery might have marked the stem on the side that faced north. It is best to keep this same orientation. If you don’t have a mark, turn it so it looks good to you.
7. Fill up the hole.
Replace the soil you dug out of the hole a little at a time, alternating with water to help fill in any air pockets. Don’t pack the soil down. Let it settle with the water. Do not add any compost or fertilizer to the hole. Use only what you dug out. If there are large chunks of soil, it’s best to keep them intact.
8. Water.
By now, the hole should be full of both water and soil. If there is still dry soil, water one more time to thoroughly soak the planting hole.
9. Mulch.
After the water soaks in a bit, add a layer of mulch around the tree three to four inches deep. Learn more: "Mulch is key to a healthy Austin Tree". Make sure the base of the stem is not covered. The more soil you cover in mulch, the better the tree’s chance to survive the transplant.
Now is also a good time to plan for future watering. You might want to spread a soaker hose around the root zone before you put down the mulch on top. You can get free mulch from Austin Resource Recovery's Recycle & Reuse Drop-off Center.
10. Stake only if necessary
Stakes can interfere with a tree’s development, so avoid them if you can. If a tree is very top-heavy or has a weak stem, install stakes loosely to allow movement, then remove them after 1-2 years. If possible, choose a different tree instead.
11. Follow-up care.
At first, your tree will need frequent watering to overcome the stress of planting. Check soil moisture daily and water the root ball whenever it seems dry more than a few inches deep. You can also view a short video on proper tree watering to get started.
After two months, the tree should be sending roots out into the native soil, so water a wider area. During dry weather, most new trees will need water at least once a week for the first two years. After that, you can begin to water only during severe droughts. Mature trees do fine with less frequent, deeper soakings. You can learn more from this Grow Green Guide.
Learn more about trees and resources at the Tree Information Center!
Article by Keith Babberney, City of Austin Forester. Illustrations by Laura Jackson.